
Yeah, there’s a Nendo Face Maker website out! You can order the faces you make, for the Nendoroid bodies you already own. Until an English version’s available, we’ve made a guide to using the Nendoroid Face Maker website in Japanese.
Step 1 – create an account
You need to have a Japanese address and phone number to register, for delivery.

If you want, you can use ours. Put this postcode in the boxes next to the 〒 symbol – ‘546 – 0021’ – and hit the grey button below it to automatically fill most bits in. It should pop up with “大阪府” in the dropdown menu, and “東住吉区照ケ丘矢田” in the box below it. One of the boxes will still be blank: type in ‘1-23-7 DEJAPAN’ (including the dashes!) to complete the address.
For the phone number, use: 06-6796-9669. If anyone calls us, we’ll email you.
Please note that other than Nendoroid Face Maker orders, we do not accept any items ordered directly by the customer at our warehouse. Do not use our warehouse address on any site except for the Nendoroid Face Maker! For more information, please check our announcement.
(When it comes to arranging and paying for the international delivery from us to you, see the end of Step 4.)
Anything with the red 必須 kanji next to it is a required field. You have to fill those in. All the fields are, in order:
- Name (last name, first name)
- Name in Japanese kana (last name, first name) – use this quick kana generator
- Address
- Phone number
- Email address (put it in both boxes to confirm)
- Password (put it in both boxes to confirm)
- Date of birth
- Gender
- Occupation
- Wanna receive the mail magazine? (top option for yes, bottom option for no)
And then hit the button at the bottom to continue. Damn, that form was too long to screencap! We’re hoping they make a global version in English for everyone to use, even though that means this guide won’t be so useful any more…
Once you’ve finished signup and you’re logged in, the right side of the homepage will change.
Step 2 – decide the basics
There, you get a message saying ‘login complete, are you ready to Nendo face?’ Okay, that’s a very rough translation, but that’s more or less what it says. Hit the green button below the cute Nendo to begin the face maker.

You can make 2 faces per order. The cost of an order is between 1,080 yen and 1,480 yen (including tax), depending on the option you choose. Use the drop down box to pick a face combination. The first bit says ‘choose an option’, duh.

One of them’s always an ‘original’ face, which you make however you want. The second one can be an ‘original’ face or a ‘noppera’ face. A ‘noppera’ face isn’t printed, and will arrive blank. So that’s what costs a little less if you pick ‘original + noppera’.
After that, you choose whether you want your designs shown in the ‘Everyone’s Faces’ gallery. It’s a special page on the site, and also shown at the bottom of the homepage. The site admin will check the latest faces every so often, and pick new designs for the gallery. Those faces can be shared on Twitter and Facebook as well.

Be careful here – the top option means no, and the bottom one means yes. Make sure you pick ‘no’ if you’d rather the world didn’t gaze on your creations. Decide, and the button below that will turn green, and you can continue to the next screen.
Step 3 – start making faces
So, you’re met with a totally blank face. Time to design one.

You’ve gotta lotta options here. There are 16 parts of the face to make, with some in the sub-menus:
- Eyes: shape
- Eyes: eyelids
- Eyes: pupils
- Eyes: glowy bit 1
- Eyes glowy bit 2
- Nose
- Mouth
- Eyebrows
- Cheeks
- Other: face paint
- Other: moustache
- Other: mole 1
- Other: mole 2
- Other: mole 3
- Other: scratches
- Other: wrinkles
You get a preview of every detail. Use the direction arrows to move parts, the plus and minus signs to edit sizes, and the spinning arrows to rotate. The white button bottom right removes whatever you just placed.
If you’re making 2 original faces, don’t forget to switch to the second one when the first’s done. You can see what you’re working on from the yellow bit and the ‘1’ or ‘2’ at the top. If the other one’s a ‘noppera’ face, you won’t be able to switch.
Custom options and colours
The Nendo Face Maker gives you the freedom to create whatever face you can think of. The customisation choices are intense. You can even decide whether to design each eye individually. Heterochromia Nendo? Completely up to you.

Can’t decide what eye shape your Nendo should have? Well, duh, there are at least 10 to choose from. Settling on a shape, style, and colour combo could take you hours.
Or maybe you already decided. See those 2 buttons to the right of the OFF one? The first means ‘order history’ – you can see and re-order any face you’ve made before. The one after that is ‘Everyone’s Faces’. Yes, if you’re really that uninspired, you can order a finished face that someone else made.
Please take screenshots of your finished faces. We’ll need them to match your order to your info.
Step 4 – check out
The best thing about the Nendoroid Face Maker is that it’s not just a game. Once you’ve designed some faces, you can order and pay for them. The green ‘finished!’ button at the top right is hard to miss.

Checkout works as it does on most other websites. The green button is ‘go to checkout’. The yellow one is for paying via an Amazon Japan account, if you’ve got one.

Up to you whether you want to pay by credit card or PayPal. You’ll know the difference – one says ‘PayPal’ and one doesn’t.
When the order’s complete, you’ll get a confirmation email. Custom Nendo faces are made from scratch, so they’ll take up to 14 working days to arrive at the Japanese delivery address. If you send it to us, we’ll then arrange international shipping to you.
You’re gonna need a DEJAPAN account for the delivery bit, so make sure you’re registered on our website.
Step 5 – Send DEJAPAN your order
Now that you’ve submitted your order with Nendoroid Face Maker, you’ll need to submit the order to us, so that we know it’s coming. If you don’t complete this step, and we can’t find a way to contact you, your faces will be discarded!
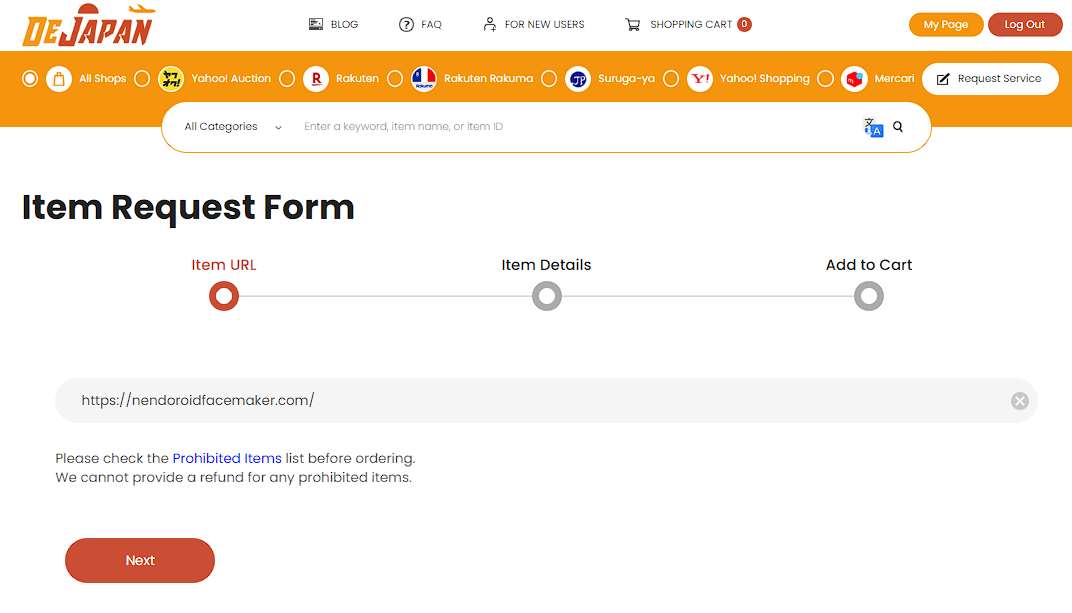
To submit your order, head to our Request Form, and paste in the URL for the face maker site (https://nendoroidfacemaker.com/). Then click Next.
On the next screen, you’ll need to edit the Item Name and Item Image fields.
For the Item Name, enter “Nendoroid Faces (0000000)”, and make sure to replace the zeros with your Face Maker order number.
For the Item Image, delete the auto-filled image, and upload a screenshot of the faces you ordered. This helps our warehouse team make sure that the correct faces arrived.
IMPORTANT: Leave the Item Price field as 0 JPY, since you’ve already paid through the Face Maker site! If you make a payment at this stage, we’ll have to cancel the order and have you re-submit.
Here’s how your order form should look:
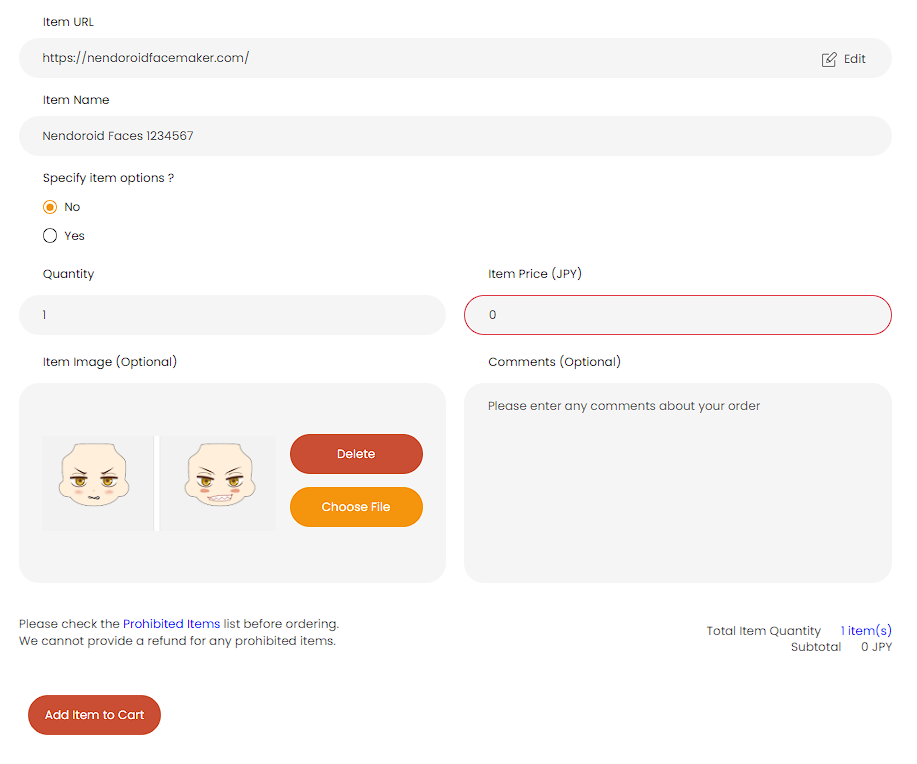
Finally, click “Add Item to Cart”. If you have more than one order, repeat this process. Once you’ve added all of your orders to your cart, proceed through checkout.
Step 6 – have fun with your new creations
When the faces arrive, stick them on any Nendo you like. Maybe you made a face with a specific character in mind. Or maybe it’s a design that works on whoever. Anyway, have fun detaching and reattaching new faces. That sounds wrong, but we can’t make it sound any better.
We covered faceswapping a bit in our blog post about Nendoroids, if you need some inspiration.
Make a (^_^) face not a (T_T) face
Be brave, and give the Japanese version of the Nendoroid Face Maker a try.
Also check out our other Nendoroid-related posts!


What a fantastic service you are providing! Thank you so much for this! I’ve always heard of this maker service but I was told it was for Japanese residents only.
Thank you so much for your kind words!
It is usually only available to Japanese residents, but we want to help people anywhere in the world get these items!
Please feel free to place an order if there’s anything you’d like.
Sorry, im having some issues with email:( i can’t find your email to sign up
Hi Margoth,
Thanks for the comment!
If you are wondering how to sign up for DEJAPAN, you can sign up through this link here. https://www.dejapan.com/en/signup
If you are still having difficulty, please feel free to send us a message here. https://www.dejapan.com/en/page/contact-us
We hope to hear back from you soon.
Hi. Im having issues with the phone number. It says it have to be within 5 characters
Hi Saulo,
Thanks for the comment!
Could you please email us at contact@dejapan.com with a screenshot of that error if you’re still having the same issue?
We’re happy to look into this!
i have silly question, how it take long time for Nendoroid arrive after i order in 2024/11/19. everything i follow is perfect. SOOO….id know when and time. thank for ask.
Hi Israel,
Thanks for the comment!
According to the Nendoroid website, shipping can take up to 14 days after they send the order confirmation email.
So, it might take around 3–4 weeks for our warehouse team to mark your item(s) as arrived.
Please feel free to email us at contact@dejapan.com if you have any further questions!
Hello,
I just purchase the nendoroid faces and I am a bit confused. Do I need to fill out the request form after I just paid? And how do I send the screenshot to you? Thank you.
Hi Mori,
Thanks for the comment!
Once you have purchased the Nendroid Faces, please place an order through our request form. On the form there will be a field for you to upload an image, please upload your screenshot there.
Please feel free to email us at contact@dejapan.com if you have any further questions!
Hello, I wonder if you might want to update your guide, because the website is pretty different now, it took me a while to figure out… basically once you finish editing one face, you have to go to your “order history” button and confirm that you want that face, and then it lets you move onto face 2. You have to go to the order history again, confirm that face, and then it lets you go to check out. This is probably intuitive if you can read Japanese, but because I can’t, I spent a long time trying to figure out why I kept adding faces to “My Faces” instead of the cart lol
Anyway thank you so much for being a resource for this!!!! If we ordered like 8 faces, would you be able to combine shipping costs?
Hi Mebe,
Thanks for the comment!
We will review the blog post and hopefully update it to match the current Facemaker Site.
Once all the faces have arrived at our Warehouse, feel free to consolidate them all into the same parcel and we will ship them to you together.
Hello, do you still offer this proxy ordering service for custom Nendoroid faceplates?
Hi Music,
Thanks for the comment!
We do still process orders for Nendroid Facemaker! Feel free to follow the instructions on the blog to put in an order!
Let us know if you have any questions!
Hello~ Just checking, do you still offer this proxy ordering service for custom Nendoroid faceplates?
I just wanted to ask if there are multiple skin tones available?
Is there only a white skin tone available or can you choose a cinnamon one?
Hi, I’m gonna review nendo face making and shipping service from dejapan
I’m waiting for 3 weeks, include the company produce your nendo face. I used double packing option and EMS shipping and it arrived safely. It’s kinda quick for me since it have a covid-19 situtation.
Here my nendo face pic for example. Hope it useful for you guys 🙂
https://www.picz.in.th/image/2T1I1Z
I would love to ask some questions, for people who has tried this metod to get the faces.
-What country are you from?
-How much cost the shipping to your country?
-Was it difficult to understand anything?
-Did you used your real name, or a katakana name to register?
-Is it still available this metod?
May I ask whether you have a fee calculator so I can calculate the fee needed for the international shipping from japan to my address(not US) ><
Thanks!
Sure you can ask! And sure we do have a calculator – https://www.dejapan.com/en/top/cart/asp/estimate.asp
Спасибо за информацию!!!!!
Thank you for the helpful guide! I just successfully ordered 2 faceplates for my nendoroids and I’m very excited for them ^^
Where can we find the order number?
It should be in the confirmation email you get from the NFM website when you’ve bought the faces. 🙂
Hello, thank you so much for this !
I would like to know if it was possible to ask the face with the nose done? I don’t really know how to explain it but in official Nendoroid, some of them got the nose in relief?
Hi! We know what you mean 🙂 The Face Maker faces don’t have a relief nose option, as far as we know. You can pick a design nose, but it’ll be printed on like the other parts. Let’s hope they add one!
How will you contact us if they call?
As above: “If anyone calls us, we’ll email you.” 🙂 You need a DEJAPAN account to finish the order, so we’ll have your contact info that way.
Hi, I’m writing this to ease any lurkers who feel worried about using dejapan + face maker!!
Last month, I used this guide in order to make two face plates for a custom nendo I’m working on. After waiting for 3-4 weeks, the faces came in fantastic quality.
Here are some images I took of the faces + and a comparison of the skintone compared to a regular white skintone.
https://i.imgur.com/IL4uLEX.png
https://i.imgur.com/AOOpidL.png
I hope this is useful for you guys!!
Thanks for the comment, these are great pics of the finished faces. 😀
Hello!
I’m thinking about doing this but Ibwas wondering what to write in the name and surname sections when I register 🙂 thanks!
For the Face Maker site’s name boxes, you might wanna turn your name into katakana here: https://www.sljfaq.org/cgi/e2k.cgi
The process was fun and simple! I’m super excited to receive my nendoroid faces! If the process goes well I will be buying so much more from you guys!! 😀
Thank you so very much for this guide, it was super helpful and I just used it to make a purchase, so all I gotta do now is wait for it to arrive to your warehouse and then contact you from there to ship it to me in the USA :3
If this all goes well, then I will be making more purchases in the future :3
I am thinking of doing this myself so I’m wondering how everything worked out for you?
Yeah, if you’re reading this and you’ve tried out the Face Maker, let us know how it went! 🙂